Cài đặt thư viện jsoup vào project Android
Có thể tham khảo tảng chủ của jsoup trước khi bắt đầu: https://jsoup.org/
Tạo project Android đặt tên là JsoupDemo:
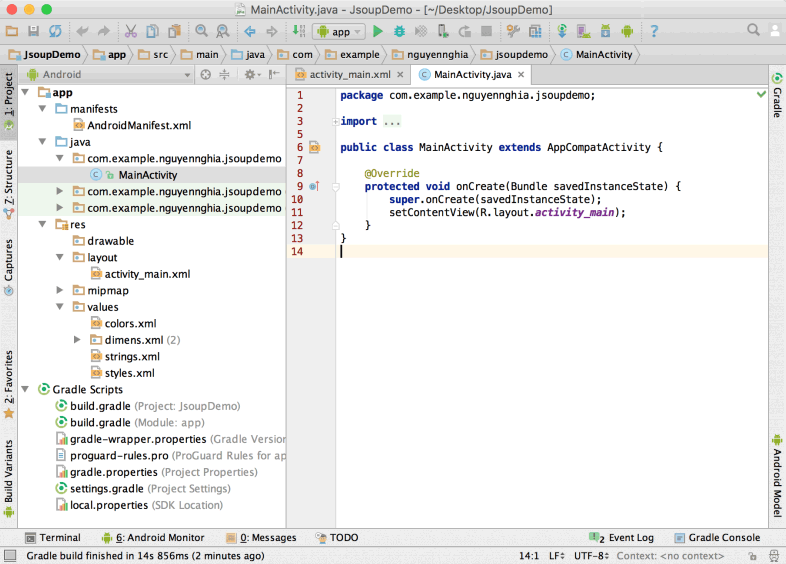
Để cài đặt thư viện vào project vừa tạo, dán dòng dưới đây vào dependencies trong file build.gradle (Module: app):
compile 'org.jsoup:jsoup:1.9.2'
Sau đó, nhấn Sync Now để Android Studio tự động nạp thư viện vào project, đến đây xem như cài đặt thành công thư viện jsoup.
Tạo Document từ các nguồn dữ liệu
Để tạo đối tượng Document bằng jsoup có rất nhiều cách và từ rất nhiều nguồn dữ liệu khác nhau.
- Từ 1 chuỗi có định dạng tài liệu HTML đầy đủ.
- Từ 1 chuỗi có định dạng 1 phần của tài liệu HTML.
- Từ 1 đường dẫn tới trang web.
Cách 1: tạo Document từ String
Jsoup.parse(String html)
Phương thức Jsoup.part trả về 1 đối tượng là Document từ 1 String có định dạng HTML đầy đủ.
String html = "<html><head><title>First parse</title></head><body><p>Parses the input HTML into a new Document.</p></body></html>";
Document doc = Jsoup.parse(html);
Cách 2: tạo Document từ 1 phần nội dung
Jsoup.parseBodyFragment(String html)
Phương thức Jsoup.parseBodyFragment trả về 1 đối tượng là Document từ 1 String là 1 phần của HTML.
String html = "<div><p>.</p>";
Document doc = Jsoup.parseBodyFragment(html);
Element body = doc.body();
Cách 3: tạo Document từ url
Jsoup.connect(String url)
Phương thức Jsoup.connect trả về 1 đối tượng là Document từ 1 trang web.
Để tạo Document từ url, Android phải tải nội dung của trang web thông qua network. Vì thế, nếu dùng cách thứ ba thì không được đặt trong UI thread mà phải tạo thread khác để xử lý ví dụ như AsyncTask, ...
Document doc = Jsoup.connect("https://training.iostream.co/").get();
String title = doc.title();
Trong phần phân tích dữ liệu từ Document, được giới thiệu ở phía dưới cũng sẽ sử dụng cách này.
Cách 4: tạo Document từ tập tin
Jsoup.parse(File in, String charsetName, String baseUri)
Phương thức Jsoup.parse trả về 1 đối tượng là Document từ 1 tập tin (file).
File file = new File("/tmp/eitguide.html");
Document doc = Jsoup.parse(file, "UTF-8");
Bóc tách dữ liệu từ Document
Trong ví dụ thực hành này, sẽ lấy thông tin các khóa học lập trình trong trang https://training.iostream.co/training bao gồm:
- Tên khóa học lập trình.
- Mô tả.
- Học phí.
- Thời lượng học.
- Hình đại diện.
package com.example.nguyennghia.jsoupdemo;
import android.os.AsyncTask;
import android.support.v7.app.AppCompatActivity;
import android.os.Bundle;
import android.util.Log;
import org.jsoup.Jsoup;
import org.jsoup.nodes.Document;
import org.jsoup.nodes.Element;
import org.jsoup.select.Elements;
import java.io.IOException;
import javax.security.auth.login.LoginException;

public class MainActivity extends AppCompatActivity {
    private static final String TAG = "MainActivity";
    private static final String URL = "https://training.iostream.co/training";

    @Override
    protected void onCreate(Bundle savedInstanceState) {
        super.onCreate(savedInstanceState);
        setContentView(R.layout.activity_main);
        new DownloadTask().execute(URL);
    }

    static class DownloadTask extends AsyncTask<String, Void, Void> {
        @Override
        protected Void doInBackground(String... strings) {
            Document document = null;
            try {
                document = (Document)Jsoup.connect(strings[0]).get();
            } catch (IOException e) {
                e.printStackTrace();
            }
            return null;
        }
    }
}
Vì việc lấy dữ liệu cần sử dụng mạng nên phải cấp quyền sử dụng internet trong file AndroidManifest.xml:
<?xml version="1.0" encoding="utf-8"?>
<manifest xmlns:android="http://schemas.android.com/apk/res/android"
    package="com.example.nguyennghia.jsoupdemo">
    <uses-permission android:name="android.permission.INTERNET"/>
    <application
        android:allowBackup="true"
        android:icon="@mipmap/ic_launcher"
        android:label="@string/app_name"
        android:supportsRtl="true"
        android:theme="@style/AppTheme">
        <activity android:name=".MainActivity">
            <intent-filter>
                <action android:name="android.intent.action.MAIN" />

                <category android:name="android.intent.category.LAUNCHER" />
            </intent-filter>
        </activity>
    </application>
</manifest>
Tiến hành xử lý Document trong phương thức doInBackground(), vào trang chủ https://training.iostream.co/training khảo sát cấu trúc HTML:
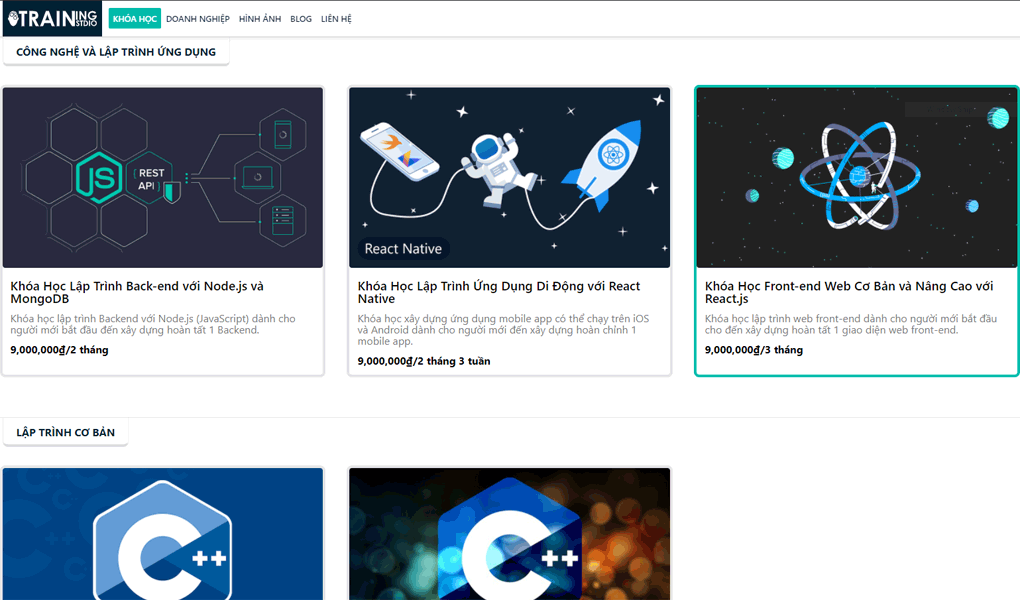
Bật công cụ kiểm tra phần tử (inpsector) trên trình duyệt web, nhận thấy các khóa học đều có điểm chung là nằm trong thẻ div có class là subjectItem___ebvMn:
<div class="subjectItem___ebvMn">
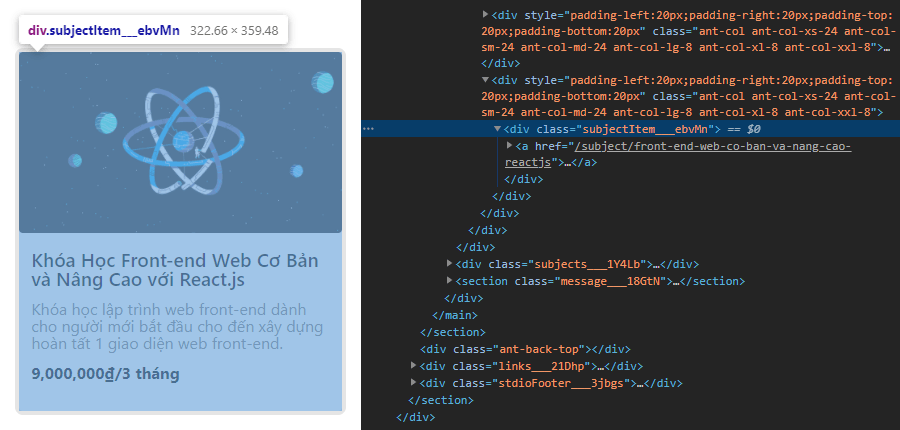
Vậy code để lấy tất cả những thẻ div có class là subjectItem___ebvMn:
Elements subjects = document.select("div.subjectItem___ebvMn");Sau đó, lần lượt duyệt qua tất cả các phần tử trong subjects để lấy ra các thông tin cần thiết. Mở thẻ div có class là subjectItem___ebvMn, thấy nội dung như dưới đây:
<div class="subjectItem___ebvMn">
    <a href="/subject/front-end-web-co-ban-va-nang-cao-reactjs">
        <div class="thumbnail___2Gduy">
            <img src="/static/shared/subjects/front-end-web-co-ban-va-nang-cao-voi-reactjs.png">
        </div>
        <div class="title___2gOGC">
            <p></p>
            <h2>Khóa Học Front-end Web Cơ Bản và Nâng Cao với React.js</h2>
            <p>Khóa học lập trình web front-end dành cho người mới bắt đầu cho đến xây dựng hoàn tất 1 giao diện web front-end.</p>
            <p>
                <b>9,000,000₫<!-- -->/<!-- -->3 tháng</b><br>
            </p>
        </div>
    </a>
</div>
Phân tích và thiết kế cách lấy dữ liệu
- Tên khóa học lập trình: thẻ
<h2>. - Mô tả: thẻ
<p>thứ 2. - Học phí: thẻ
<b>. - Thời lượng học: thẻ
<b>. - Hình đại diện: thẻ
<img>. - Do học phí và thời lượng học nằm chung thẻ
<b>do đó có thể xử lý thêm về chuỗi sau khi lấy dữ liệu trong thẻ<b>.
Element title = subject.getElementsByTag("h2").first();
Element description = subject.getElementsByTag("h2").first();
Element values = subject.getElementsByTag("b").first(); // Hoc phi + Thoi luong
Element thumbnail = subject.getElementsByTag("img").first();
Tiếp theo lấy các thuộc tính của từng phần tử:
if (title != null) {
    String titleText = title.text();
    Log.e(TAG, "title: " + titleText);
}
if (description != null) {
      String descriptionText = description.text();
      Log.e(TAG, "description: " + descriptionText);
}
if (values != null) {
      String valuesText = values.text();
      Log.e(TAG, "Price/Duration: " + valuesText);
}
if (thumbnail != null) {
    String thumbnailSrc = thumbnail.attr("src");
    Log.e(TAG, "thumbnail: " + thumbnailSrc);
}
Code phương thức doInBackground() đầy đủ:
@Override
protected Void doInBackground(String... strings) {
   Document document = null;
   try {
        document = (Document) Jsoup.connect(strings[0]).get();
        if (document != null) {
            Elements subjectElements = document.select("div.gallery-item");
            if (subjectElements != null && subjectElements.size() > 0) {
                for (Element element : subjectElements) {
                    Element title = subject.getElementsByTag("h2").first();
                    Element description = subject.getElementsByTag("h2").first();
                    Element values = subject.getElementsByTag("b").first(); // Hoc phi + Thoi luong
                    Element thumbnail = subject.getElementsByTag("img").first();

                    if (title != null) {
                        String titleText = title.text();
                        Log.e(TAG, "title: " + titleText);
                    }
                    if (description != null) {
                        String descriptionText = description.text();
                        Log.e(TAG, "description: " + descriptionText);
                    }
                    if (values != null) {
                        String valuesText = values.text();
                        Log.e(TAG, "Price/Duration: " + valuesText);
                    }
                    if (thumbnail != null) {
                        String thumbnailSrc = thumbnail.attr("src");
                        Log.e(TAG, "thumbnail: " + thumbnailSrc);
                    }
                 }
            }
        }
    } catch (IOException e) {
        e.printStackTrace();
    }
    return null;
}
Kết quả sẽ thấy lấy được nội dung của các khóa học, build project và xem kết quả.
