Drawable trong Android
Khái niệm Drawable
Drawable là khái niệm chung về đồ họa để chỉ những gì có thể vẽ, đơn giản là hình ảnh (Drawable hình ảnh trong Android gọi là BitmapDrawable).
Drawable định nghĩa shape, color, gradient, border, ... có thể sử dụng nó vào View trong Activity.
Trong Android, Drawable được sử dụng rất nhiều:
- Background của
View. - src của
ImageView. - State (press, normal, ...) của
View. - ...
Các loại Drawable trong Android
Có nhiều loại Drawable, sử dụng nhiều nhất là BitmapDrawable (đặt src cho ImageView):
- BimapDrawable
- ColorDrawable
- GradientDrawable
- ShapeDrawable
- RippleDrawable (Android 5.0)
- VectorDrawable
- AnimatedDrawable (Android 5.0)
- StateListDrawable
- 9 Paths Drawables
Ngoài những Drawable trên, có thể tạo Drawable khác kế thừa từ các Drawable trên (lớp cha của tất cả Drawable là lớp Drawable).
Sử dụng Drawable cho View
Có thể truy cập Drawable từ thư mục drawable của project như sau:
- Trong XML: sử dụng
@drawable/drawable_name. - Trong Java: sử dụng
R.drawable.drawable_name.
Ví dụ sử dụng Drawable để làm src cho ImageView trong XML:
<ImageView
    android:src="@drawable/android"
    android:layout_width="wrap_content"
    android:layout_height="wrap_content" />
Và trong Java:
ImageView imvAvatar = (ImageView)findViewById(R.id.imv_avatar);
imvAvatar.setImageResource(R.drawable.android);
Có thể tạo đối tượng Drawable trong Java và sử dụng các phương thức hỗ trợ đặt Drawable như sau:
ColorDrawable colorDrawable = new ColorDrawable(Color.RED);
imvAvatar.setImageDrawable(colorDrawable);
Drawable bitmapDrawable = null;
if (Build.VERSION.SDK_INT >= Build.VERSION_CODES.LOLLIPOP)
    bitmapDrawable = getResources().getDrawable(R.drawable.android, getTheme());
else
    bitmapDrawable = getResources().getDrawable(R.drawable.android);

if(bitmapDrawable != null)
    imvAvatar.setBackground(bitmapDrawable);
Tuy nhiên, phương thức setBackground() yêu cầu Android API 16, nên sử dụng các phương thức setDrawable() thông qua resource id. Ví dụ như phương thức setImageResouce(int resId) của ImageView.
1 số Drawable phổ biến
BitmapDrawable
Thực chất là 1 Bitmap nhưng Drawable có thể đặt nhiều thuộc tính, trước khi vẽ nên cho Drawable các giá trị như kích thước chiều rộng, chiều cao và alpha (độ trong suốt).
Để sử dụng BitmapDrawable, trong XML thêm hình ảnh vào thư mục Drawable.
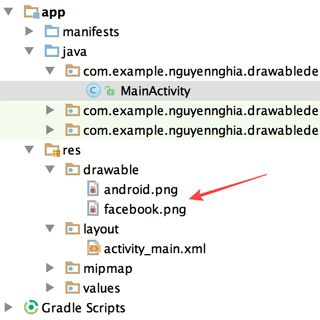
Sau đó sử dụng @drawable/drawable_name để gán Drawable cho View:
Trong XML:
<TextView
    android:id="@+id/tv_title"
    android:drawableLeft="@drawable/facebook"
    android:text="facebook"
    android:layout_width="wrap_content"
    android:layout_height="wrap_content" />
Trong Java:
// Set BitmapDrawable left for TextView
BitmapDrawable bitmapDrawable = new BitmapDrawable(getResources(),BitmapFactory.decodeResource(getResources(), R.drawable.facebook));
((TextView)findViewById(R.id.tv_title)).setCompoundDrawablesWithIntrinsicBounds(bitmapDrawable, null, null, null);
ShapeDrawable
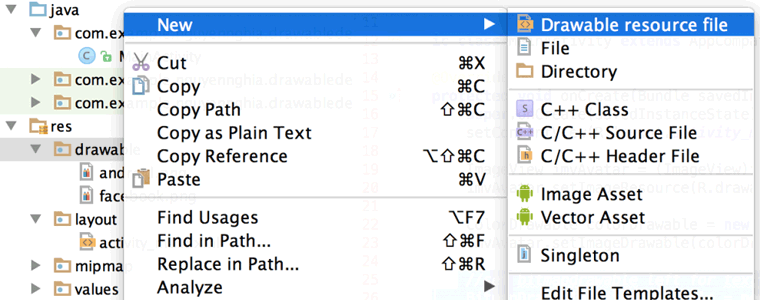
ShapeDrawable cho phép vẽ các hình học cơ bản trong Android, nhấn chuột phải vào thư mục drawable để tạo drawable resource:
Nhập tên drawable để hoàn thành:
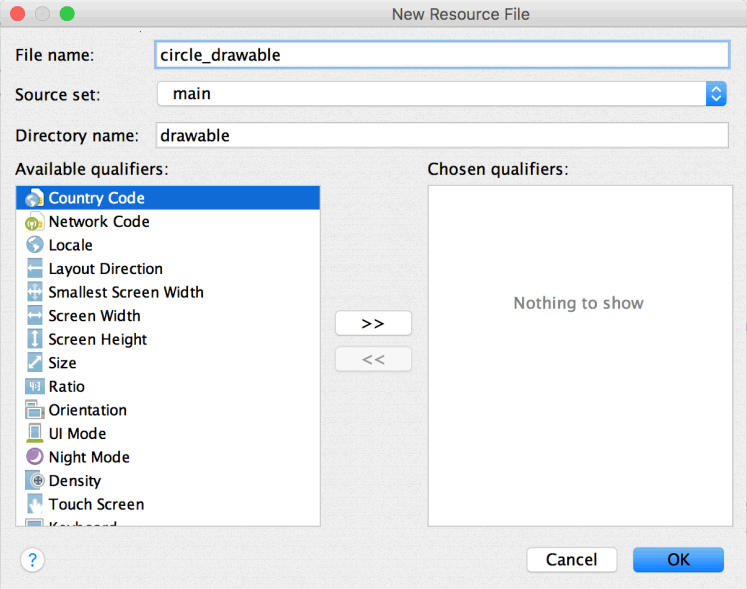
Tạo file có tên là circle_drawable với nội dung file như dưới đây:
<?xml version="1.0" encoding="utf-8"?>
<shape android:shape="oval" xmlns:android="http://schemas.android.com/apk/res/android">
    <solid android:color="#2980b9"/>
</shape>
Và sử dụng trong XML:
<View
    android:background="@drawable/circle_drawable"
    android:layout_width="300dp"
    android:layout_height="300dp"/>
Bây giờ tạo 1 drawable có hình dạng như 1 row chat của messenger facebook như sau facebook_chat_drawable.xml
<?xml version="1.0" encoding="utf-8"?>
<shape xmlns:android="http://schemas.android.com/apk/res/android">
    <corners android:topLeftRadius="20dp" android:bottomRightRadius="20dp" android:bottomLeftRadius="5dp" android:topRightRadius="5dp"/>
    <padding android:left="5dp" android:right="5dp" android:top="10dp" android:bottom="10dp"/>
    <solid android:color="#2980b9" />
</shape>
Đặt Drawable là màu nền cho TextView:
<TextView
    android:layout_margin="20dp"
    android:id="@+id/tv_message_chat"
    android:text="This is message"
    android:textColor="@android:color/white"
    android:background="@drawable/facebook_drawable_chat"
    android:layout_width="wrap_content"
    android:layout_height="wrap_content" />
Trong Java có thể làm như sau:
findViewById(R.id.tv_message_chat).setBackgroundResource(R.drawable.facebook_drawable_chat);

Sửa lại 1 số thông tin trong file facebook_chat_drawable.xml và build lại project rồi xem kết quả:
<?xml version="1.0" encoding="utf-8"?>
<shape xmlns:android="http://schemas.android.com/apk/res/android">
    <corners
        android:bottomLeftRadius="5dp"
        android:bottomRightRadius="20dp"
        android:topLeftRadius="20dp"
        android:topRightRadius="5dp" />
    <padding
        android:bottom="10dp"
        android:left="5dp"
        android:right="5dp"
        android:top="10dp" />
    <gradient
        android:angle="90"
        android:centerColor="#3498db"
        android:endColor="#16a085"
        android:startColor="#1abc9c" />
</shape>
StateListDrawable
StateListDrawable dùng để mô tả những state (normal, focus, press, disable, ...) của View, thường xuyên sử dụng cho Button và các item trên ListView hoặc RecyclerView.
Để tạo StateListDrawable cũng hoàn toàn tương tự như ShapeDrawable.
Tiến hành tạo Drawable trong thư mục Drawable có tên là button_selector.xml với nội dung như sau:
<?xml version="1.0" encoding="utf-8"?>
<selector xmlns:android="http://schemas.android.com/apk/res/android">
    <item android:state_pressed="false" >
        <color android:color="#3498db"/>
    </item>
        <item android:state_pressed="true">
            <color android:color="#2980b9"/>
        </item>
</selector>
Sử dụng Drawable cho Button:
<Button
    android:background="@drawable/button_selector"
    android:text="Save Change"
    android:textColor="@android:color/white"
    android:layout_centerInParent="true"
    android:layout_width="wrap_content"
    android:layout_height="wrap_content" />
button_state_normal.xml định nghĩa trạng thái bình thường (normal) của Button:
<?xml version="1.0" encoding="utf-8"?>
<shape xmlns:android="http://schemas.android.com/apk/res/android">
    <corners android:radius="30dp" />
    <padding
        android:bottom="5dp"
        android:left="10dp"
        android:right="10dp"
        android:top="5dp" />
    <solid android:color="#1abc9c" />
</shape>
button_state_pressed.xml định nghĩa trạng thái nhấn (pressed) của Button:
<?xml version="1.0" encoding="utf-8"?>
<shape xmlns:android="http://schemas.android.com/apk/res/android">
<corners android:radius="30dp" />
<padding
android:bottom="5dp"
android:left="10dp"
android:right="10dp"
android:top="5dp" />
<solid android:color="#16a085" />
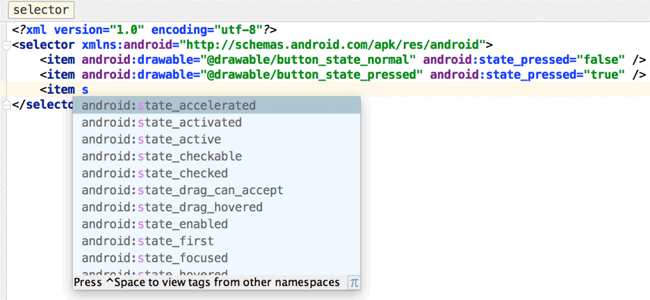
</shape>button_selector_save_change.xml định nghĩa selector của button gồm 2 state: normal và pressed.
<?xml version="1.0" encoding="utf-8"?>
<selector xmlns:android="http://schemas.android.com/apk/res/android">
    <item android:drawable="@drawable/button_state_normal" android:state_pressed="false" />
    <item android:drawable="@drawable/button_state_pressed" android:state_pressed="true" />
</selector>
Button sử dụng selector:
<Button
    android:text="Save Change"
    android:background="@drawable/selector_button_save_change"
    android:textColor="@android:color/white"
    android:layout_centerInParent="true"
    android:layout_width="200dp"
    android:layout_height="wrap_content" />
Build và chạy chương trình xem kết quả có sự khác biệt gì không?
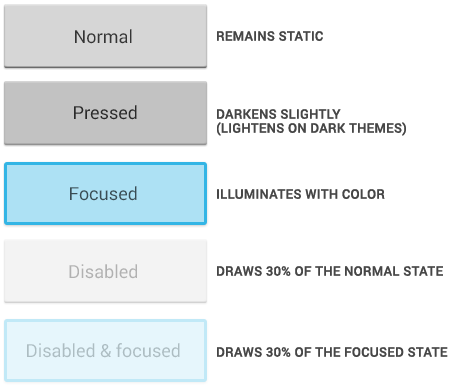
Ngoài 2 state normal và pressed trong Android, còn có nhiều state khác nữa, đa số các View trong Android đều có những state này:
VectorDrawable
VectorDrawable được giới thiệu ở Android 5.0 (API 21).
VectorDrawable có nhiều lợi thế như kích thước của file nhỏ so với việc sao chép 1 hình ảnh vào project, tự động scale theo tỉ lệ màn hình trên từng thiết bị.
Trước tiên cần enable support VectorDrawable trong tập tin build.gradle như sau:
apply plugin: 'com.android.application'
android {
    compileSdkVersion 24
    buildToolsVersion "24.0.0"
    defaultConfig {
        applicationId "com.example.nguyennghia.vectordrawable"
        minSdkVersion 15
        targetSdkVersion 24
        versionCode 1
        versionName "1.0"
        // Enable for using vector drawables
        vectorDrawables.useSupportLibrary = true
    }
    buildTypes {
        release {
            minifyEnabled false
            proguardFiles getDefaultProguardFile('proguard-android.txt'), 'proguard-rules.pro'
        }
    }
}

dependencies {
    compile fileTree(dir: 'libs', include: ['*.jar'])
    testCompile 'junit:junit:4.12'
    compile 'com.android.support:appcompat-v7:24.0.0'
    compile 'com.android.support:design:24.0.0'
}
Tiếp theo để tạo VectorDrawable, nhấp chuột phải vào thư mục drawable → New → Vector Asset:

Hộp thoại Vector Asset Studio hiện lên, nhấn Choose để chọn icon muốn xuất ra VectorDrawable, sau đó nhấn OK để Android Studio tạo tập tin drawable.

File vector được sinh ra có nội dung như sau:
<vector xmlns:android="http://schemas.android.com/apk/res/android"
        android:width="24dp"
        android:height="24dp"
        android:viewportWidth="24.0"
        android:viewportHeight="24.0">
    <path
        android:fillColor="#FF000000"
        android:pathData="M22,5.72l-4.6,-3.86 -1.29,1.53 4.6,3.86L22,5.72zM7.88,3.39L6.6,1.86 2,5.71l1.29,1.53 4.59,-3.85zM12.5,8L11,8v6l4.75,2.85 0.75,-1.23 -4,-2.37L12.5,8zM12,4c-4.97,0 -9,4.03 -9,9s4.02,9 9,9c4.97,0 9,-4.03 9,-9s-4.03,-9 -9,-9zM12,20c-3.87,0 -7,-3.13 -7,-7s3.13,-7 7,-7 7,3.13 7,7 -3.13,7 -7,7z"/>
</vector>
Sử dụng thuộc tính srcCompat để gán VectorDrawable cho View trong XML:
<ImageView
    android:layout_alignParentRight="true"
    app:srcCompat="@drawable/ic_access_alarm_black_24dp"
    android:layout_width="wrap_content"
    android:layout_height="wrap_content" />
Làm lại và chạy thử để xem kết quả.
Custom Drawable
Ở trên đã giới thiệu những Drawable được giới thiệu trong Android SDK.
Ví dụ bên dưới sẽ vẽ cung tròn (ArcDrawable) lên Canvas.
Tạo lớp ArcDrawable kế thừa từ Drawable như sau:
package com.example.nguyennghia.drawabledemo;
import android.graphics.Canvas;
import android.graphics.ColorFilter;
import android.graphics.Paint;
import android.graphics.PixelFormat;
import android.graphics.RectF;
import android.graphics.drawable.Drawable;
/**
 * Created by nguyennghia on 7/25/16.
 */
public class ArcDrawable extends Drawable {
    private Paint mPaint;
    private RectF mRect;
    public ArcDrawable(int color) {
        mPaint = new Paint(Paint.ANTI_ALIAS_FLAG);
        mPaint.setColor(color);
        mPaint.setStyle(Paint.Style.STROKE);
        mPaint.setStrokeCap(Paint.Cap.ROUND);
        mPaint.setStrokeWidth(10);
    }

    @Override
    public void draw(Canvas canvas) {
        if (mRect == null)
            mRect = new RectF();

        mRect.left = getBounds().left + mPaint.getStrokeWidth() / 2;
        mRect.top = getBounds().top + mPaint.getStrokeWidth() / 2;
        mRect.right = getBounds().right - mPaint.getStrokeWidth() / 2;
        mRect.bottom = getBounds().bottom - mPaint.getStrokeWidth() - 2;
        canvas.drawArc(mRect, 45, 270, false, mPaint);
    }

    @Override
    public void setAlpha(int alpha) {
        if (mPaint != null)
            mPaint.setAlpha(alpha);
    }

    @Override
    public void setColorFilter(ColorFilter cf) {
        mPaint.setColorFilter(cf);
    }

    @Override
    public int getOpacity() {
        return PixelFormat.TRANSLUCENT;
    }
}
Và sử dụng Drawable này như sau:
ImageView imvAvatar = (ImageView)findViewById(R.id.imv_avatar);
ArcDrawable arcDrawable = new ArcDrawable(Color.parseColor("#16a085"));
imvAvatar.setImageDrawable(arcDrawable);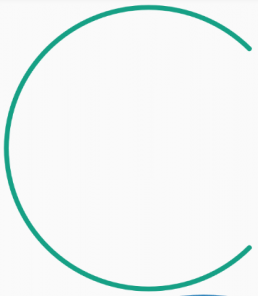
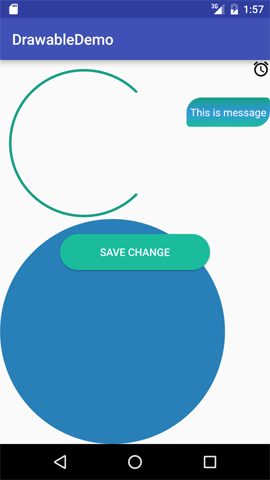
Và dưới đây là hình ảnh của Drawable đã sử dụng trong bài viết từ đầu đến cuối: